Blog
How to Create Hanging Indents in Canva
The hanging indent is a subtle yet powerful tool for enhancing readability and visual appeal in typography and document formatting. It allows for the clean alignment of text while clearly distinguishing paragraphs.
Canva, a versatile graphic design platform, allows users to easily create visually stunning documents, including the implementation of hanging indents.
This guide on Turnit Studio will teach you how to create hanging indents in Canva. We’ll provide easy-to-follow instructions and useful tips to help you master this important formatting technique.
IN THIS ARTICLE
What is Canva?
Canva is a versatile online graphic design platform that enables users to create various visual content, from social media graphics and presentations to posters and flyers. With its user-friendly interface and extensive library of templates, Canva simplifies the design process for individuals and businesses of all skill levels.
Users can easily edit photos and text, customize templates, and add their personal touch to create professional-looking designs in minutes. Whether you’re looking to enhance your social media presence, create marketing materials, or design eye-catching presentations, Canva offers the tools and resources to bring your ideas to life easily.
Understanding Hanging Indents
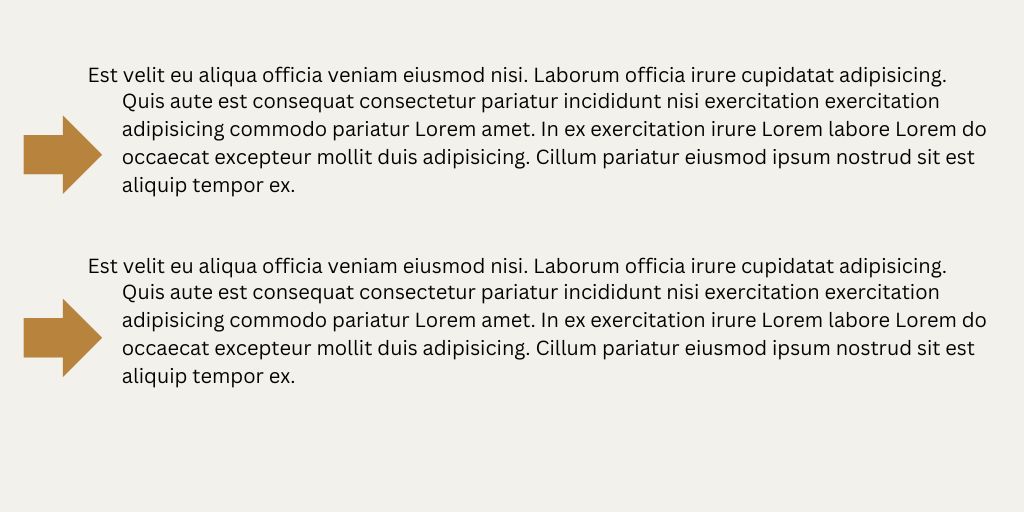
Before we jump into how to make hanging indents in Canva, let’s make sure we’re on the same page about what hanging indents actually are. Think of a hanging indent as a way to make your text look neat and organized. With a hanging indent, the first line of a paragraph starts at the left margin, just like normal. But then, all the other lines in the paragraph are indented a bit to the right, giving your text a tidy and professional appearance.
This formatting trick is handy for things like academic papers, reports, or lists because it helps readers easily see where each new paragraph or item begins. It’s like giving your text a little visual boost to make it look more polished and easy to read.
So, before we get into the nitty-gritty of using hanging indents in Canva, it’s good to understand how they can improve the look and readability of your documents.
Exploring Canva Text Formatting Tools
Canva offers a comprehensive suite of text formatting tools designed to cater to the diverse needs of its users. With an intuitive interface and user-friendly controls, Canva makes it effortless to customize text elements to perfection. Users have access to a wide array of options, allowing them to fine-tune every aspect of their text, from alignment and font styles to sizes and spacing.
When it comes to alignment, Canva provides flexibility, enabling users to align text to the left, right, center, or justify it for a polished and professional appearance. Font styles are equally customizable, with an extensive library of fonts to choose from, ranging from classic and elegant to modern and bold. Users can easily experiment with different font combinations to find the perfect match for their project’s tone and style.
Furthermore, Canva allows users to adjust font sizes with precision, ensuring readability and visual hierarchy within their designs. Whether it’s making headlines stand out or ensuring body text is legible, Canva’s text sizing options offer unparalleled control. Additionally, users can fine-tune spacing between lines and letters, ensuring optimal readability and aesthetic appeal.
In essence, Canva’s text formatting tools empower users to unleash their creativity and bring their vision to life with ease. Whether you’re designing social media graphics, presentations, or marketing materials, Canva provides the tools and flexibility you need to create stunning designs that captivate your audience.
Creating a Hanging Indent in Canva: Step-by-Step Guide
1- Accessing Canva’s Text Tool: Begin by logging into your Canva account and creating a new design or opening an existing one. Navigate to the text tool located in the toolbar on the left-hand side of the screen.
2- Adding Text to Your Design: Click on the text tool and then click anywhere on your design canvas to add a text box. Alternatively, you can choose from a selection of pre-designed text templates available in Canva’s extensive library.
3- Formatting Your Text: Type or paste the text you wish to format into the text box. Adjust the font style, size, and color to your liking using the formatting options provided in the text toolbar.
4- Setting the Hanging Indent:
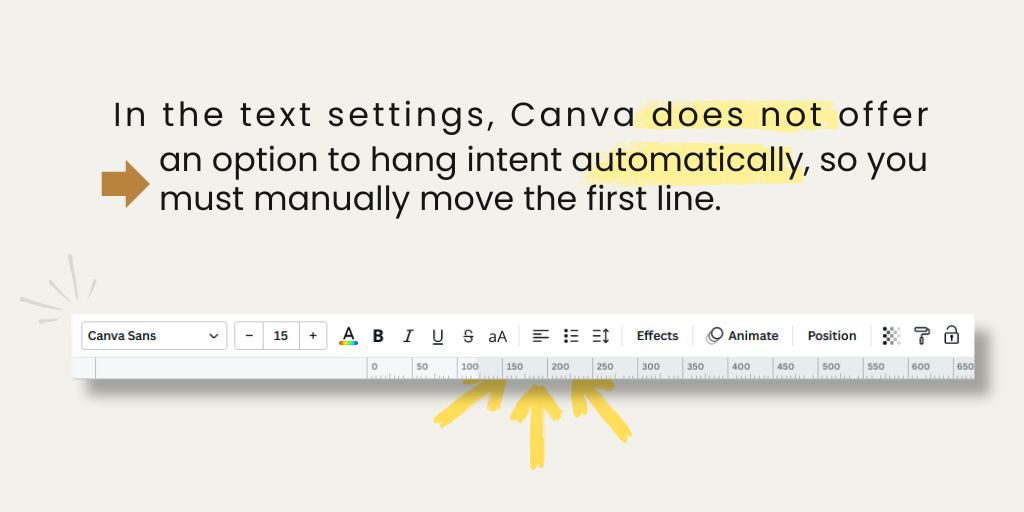
In the text settings, Canva does not offer an option to hang intent automatically, so you must manually move the first line.
First, duplicate your text box by copying and pasting it, holding the alt button, and dragging your mouse.
In the first box, keep the first line and delete the rest of the paragraph. After that, delete the first line from the second text box.
By moving the text boxes, you can adjust the paragraph’s appearance.
5- Adjusting the Indentation: If needed, you can further customize the indentation of the hanging indent by clicking and dragging the triangular indent marker on the ruler located at the top of the text box.
6- Preview and Fine-Tuning: Once you’ve applied the hanging indent, preview your text to ensure it appears as desired. Make any additional adjustments as needed to achieve the desired formatting.
Tips and Tricks for Optimal Hanging Indent Usage
- Consistency is Key: Maintain consistency in the use of hanging indents throughout your document to ensure a polished and professional appearance.
- Use Sparingly: Reserve the use of hanging indents for instances where it enhances readability and visual appeal, such as in long paragraphs or lists of items.
- Consider Alignment: When using hanging indents in conjunction with other formatting styles, such as bullet points or numbered lists, consider how they align with the rest of your document for a cohesive look.
Pro tips
- When working with lengthy text that spans multiple paragraphs, it is important to utilize guides in order to maintain the entire text on a single line. To activate the guide, navigate to file > settings and enable the show rollers and guides option.
- If the first line is not aligned with the text box below, you can use letter spacing to align the text.
FAQ
What is the purpose of a hanging indent in text formatting?
A hanging indent is a typographical technique where the first line of a paragraph starts at the left margin, while subsequent lines are indented further to the right. The primary purpose of a hanging indent is to visually distinguish between the first line of a paragraph (often used for titles or headings) and the subsequent lines (used for body text or bullet points). It helps improve readability and organization in documents, such as bibliographies, references, and lists.
Can I apply a hanging indent to specific paragraphs or text sections in Canva?
Yes, you can apply a hanging indent to specific paragraphs or text sections in Canva. While Canva doesn’t have a built-in feature specifically labeled as “hanging indent,” you can achieve this effect manually by adjusting the indentation settings for individual text elements. By selecting the text box containing the paragraph you want to format, you can adjust the indentation options to create a hanging indent.
Does Canva offer pre-designed templates with hanging indent formatting?
Canva provides a vast library of pre-designed templates for various document types, including presentations, flyers, and resumes. While some templates may already have hanging indent formatting applied, not all templates will include this specific formatting feature. However, you can customize any template in Canva to include a hanging indent by adjusting the text formatting settings to meet your specific needs.
Conclusion
In conclusion, Canva emerges as not just a design tool but a creative enabler, democratizing the art of graphic design for users worldwide. Its intuitive interface, vast template library, and powerful editing features empower individuals and businesses to express their creativity effortlessly.
Whether crafting captivating social media graphics, designing compelling presentations, or producing professional marketing materials, Canva provides a platform where imagination knows no bounds. With Canva, the journey from idea to polished design becomes seamless, allowing users to unleash their creativity and make their mark in the digital world with confidence.
Related Posts
Where to Sell Your Digital Products for Maximum Profit
-
Posted by
 Turnit Studio
- 0 comments
PLR Products: Everything You Need to Know
-
Posted by
 Turnit Studio
- 0 comments
What is a PLR eBook and How Can It Boost Your Online Business?
-
Posted by
 Turnit Studio
- 0 comments
Are Canva Images Copyright Free?
-
Posted by
 Turnit Studio
- 0 comments
Step-by-Step Guide to Adding Music to Canva Video
-
Posted by
 Turnit Studio
- 0 comments
Step-by-Step Guide to Fix the ‘Saving Paused’ Issue in Canva
-
Posted by
 Turnit Studio
- 0 comments
How To Print In Canva?
-
Posted by
 Turnit Studio
- 0 comments
How to Merge Two Elements in Canva
-
Posted by
 Turnit Studio
- 0 comments
Step-by-Step Guide to Editing Your Resume using Canva
-
Posted by
 Turnit Studio
- 0 comments
Discovering the Transformative Definition of Mindfulness
-
Posted by
 Turnit Studio
- 0 comments
How to Create Text Masks in Canva
-
Posted by
 Turnit Studio
- 0 comments
5 Top Canva Video Downloaders
-
Posted by
 Turnit Studio
- 1 comment


